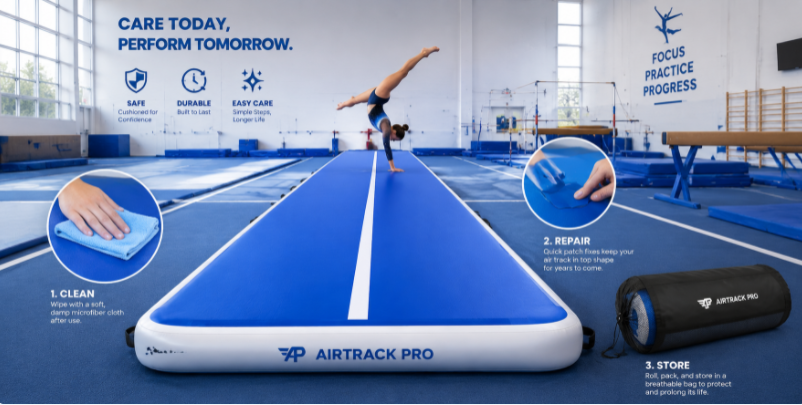
An inflatable air track is a major upgrade for any training space. It acts like a high-performance engine for athletes, providing the extra lift needed to master complex flips while acting as a supportive cushion that guards wrists, ankles, and knees from harsh impacts.
However, just like a premium vehicle or specialized gym floor, its lifespan and performance depend heavily on how well it is treated.
Investing time in proper inflatable air track maintenance ensures the surface remains safe, bouncy, and hygienic for years to come. Skipping basic upkeep can lead to slow leaks, structural wear, or unpleasant odors that ruin the training experience.
This comprehensive guide breaks down the essential steps for cleaning, repairing, and storing your inflatable track to keep it in peak competitive condition.
Daily & Weekly Cleaning: Keep It Safe & Hygienic
Think about what happens during a standard training session. Dozens of bare feet run down the lane, athletes sweat during intense workouts, and hands covered in gymnastics chalk leave powdery residue across the surface. Over time, this buildup creates a slippery film that reduces traction and creates an unhygienic environment.
Establishing a regular cleaning routine keeps the training zone sanitary and protects the outer layer of the track from wearing down early.
What You’ll Need
You do not need expensive, industrial-grade chemicals to clean your mat. In fact, heavy chemical cleaners can damage the track. Instead, gather a few simple, gentle supplies:
- Warm water: A clean bucket of warm water serves as your primary cleaning base.
- Mild soap: Gentle dish soap or a specialized, pH-neutral vinyl cleaner works perfectly. Avoid soaps with added moisturizers, artificial dyes, or heavy fragrances.
- Soft microfiber cloths or a soft-bristle brush: These lift away dirt without scratching the protective outer coating.
- A large, dry towel: Used to remove excess water before letting the mat air-dry.
- A clean broom or soft vacuum attachment: Essential for sweeping away loose dirt and chalk before applying any water.
For an exhaustive breakdown of safe cleaning products and safety specs, take a look at our dedicated Cleaning guide.
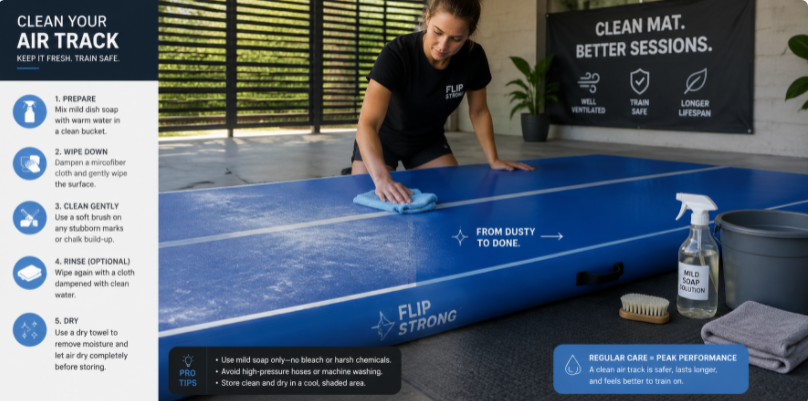
Step-by-Step Cleaning Process
Cleaning your track should be straightforward. Follow this systematic process to keep your training surface fresh and spotless:
- Clear the Surface: Before getting the mat wet, fully inflate the track. Take a clean broom or a vacuum with a soft brush attachment and clear away all loose dust, hair, and gymnastics chalk. Skipping this step turns the dry chalk into a messy paste once water is added.
- Mix Your Cleaning Solution: Fill your bucket with warm water and add a small squirt of mild dish soap. Stir gently until the water is lightly soapy.
- Wipe Down Systematically: Dip your microfiber cloth into the soapy water and wring it out so it is damp, not dripping wet. Start at one end of the track and wipe the surface down in manageable sections. For stubborn scuff marks left by shoes, rub gently in a circular motion with a soft-bristle brush.
- Clean Around the Valves: Pay close attention to the area around the inflation valve, where dust and sweat tend to settle. Be careful not to let water drip directly inside an open valve throat.
- Rinse with Clean Water: Empty your bucket, refill it with pure, clean water, and use a fresh cloth to wipe down the entire track again. This removes any leftover soap residue, which can leave a hazy, slippery film if allowed to dry on the vinyl.
- Dry Thoroughly: Take a dry towel and wipe away the bulk of the surface moisture. Leave the track inflated in a well-ventilated space out of direct, intense sunlight until it is completely dry to the touch. Never roll up or store a damp track.
What to Avoid
To protect the structural integrity of your mat, keep these dangerous cleaning practices completely away from your equipment:
- Harsh Chemical Solvents: Never use bleach, acetone, ammonia, or industrial degreasers. These chemicals break down the plasticizers inside the PVC material, making it brittle, prone to cracking, and weakening the glued seams.
- Abrasive Scrubber Pads: Steel wool, stiff wire brushes, and rough kitchen scrubbing sponges will scratch the smooth outer vinyl layer, creating micro-grooves where dirt and bacteria can hide.
- High-Pressure Power Washers: The intense force from a power washer nozzle can slice through the heavy-duty seams and tear the internal drop-stitch fibers right away from the outer walls.
- Scorching, Direct Sunlight: While a little fresh air helps dry a mat, leaving a wet track baking in hot, midday summer sunlight can overheat the internal air pocket. This causes the air to expand rapidly, putting dangerous pressure on the seams while degrading the UV-protective coating.
Applying these basic air track cleaning tips every week prevents dirt buildup and keeps the surface safe and slip-resistant for athletes.
Fixing Small Leaks: How to Patch Like a Pro
Even though commercial-grade double-wall fabric is incredibly tough, accidents can still happen. A sharp stone on the grass, a misplaced bobby pin, or a sharp zipper can cause a small puncture.
If you notice your track feels a bit soft halfway through a training session, you likely have a small puncture. Fortunately, inflatable gym mat repair is a straightforward task that you can handle yourself.
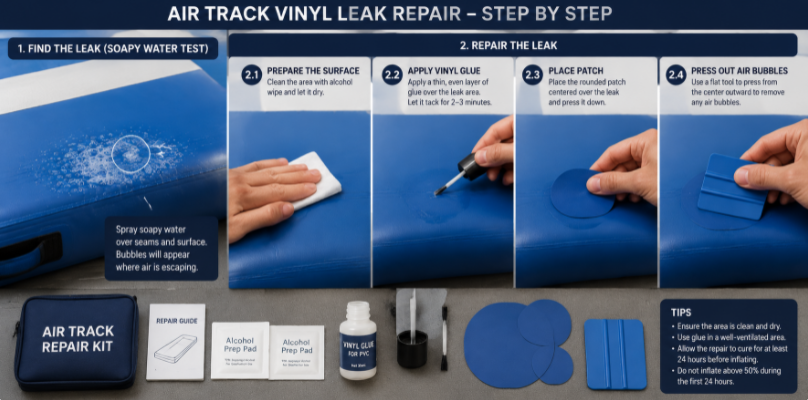
Step 1: Locate the Leak
Finding a tiny hole can feel like searching for a needle in a haystack. The most reliable way to find it is by using the classic soapy water test:
- Fully inflate your air track so it is firm and under pressure.
- Mix a generous amount of dish soap with water in a clean spray bottle or bucket until it is highly sudsy.
- Spray or wipe the soapy water over the suspected area. If you aren't sure where the leak is, start by checking around the valve assembly and along the welded side seams, as these areas experience the most physical stress.
- Watch the surface closely. When soapy water passes over a puncture, the escaping air will quickly create a cluster of growing, clear bubbles.
- Once you find the source of the leak, wipe the soap away with clean water and mark the exact spot with a small piece of tape or a washable marker.
Step 2: Patch the Leak
Once you have found the puncture, use your repair kit to apply a permanent, airtight patch. For a comprehensive, foolproof manual on fixing punctures, review our detailed Hole repair guide.
Here is a summary of the patching process:
[Deflate Mat Completely]
│
▼
[Clean & Scuff the Repair Area]
│
▼
[Cut a Rounded Patch from Vinyl Sheet]
│
▼
[Apply Vinyl Glue to Both Surfaces]
│
▼
[Press Firmly & Roll Out Air Bubbles]
│
▼
[Cure Under Heavy Weight for 24 Hours]
- Deflate the Mat: Never attempt to glue a patch onto a fully or partially inflated track. The escaping air will blow right through the wet glue, creating a permanent tunnel that will leak forever.
- Prepare the Surface: The area around the hole must be completely clean and dry. Use a tiny drop of rubbing alcohol on a cloth to wipe away any oils, dirt, or soap residue.
- Cut Your Patch: Cut a circular or oval patch from the PVC repair sheet included with your track. Avoid cutting square patches with sharp corners; sharp corners catch easily on clothing or gym floors and will peel up over time. The patch should extend at least an inch beyond the hole in every direction.
- Apply the Adhesive: Apply a thin, even layer of specialized inflatable vinyl glue to both the back of the patch and the marked area on the track. Let the glue sit for 30 to 60 seconds until it looks tacky but isn't wet to the touch.
- Press and Seal: Place the patch carefully over the puncture. Use a flat roller, a blunt scraper, or the edge of a credit card to press firmly from the center of the patch outward. This squeezes out trapped air bubbles and ensures a smooth, solid bond.
- Allow to Cure: Place a heavy, flat object (like a stack of heavy books or a weight plate) on top of the patch. Leave the track deflated and let the glue cure undisturbed for a full 24 hours before inflating it again.
When to Call a Pro
While small punctures on flat surfaces are simple to fix at home, some issues require professional repair:
- Large Tears: Any gash or slice that is longer than an inch requires professional reinforcement to safely handle high tumbling pressures.
- Internal Structure Failure: If your air track develops a large, rounded bulge (often called a "bubble"), it means some of the internal drop-stitch polyester threads have snapped. This cannot be patched from the outside and requires professional service or a structural replacement.
- Seam Splits at the Corners: Seams under high tension that split across corner joints are difficult to patch effectively at home and often need specialized industrial welding equipment.
Understanding how to maintain an air track means knowing when a quick DIY fix works perfectly and when an issue requires professional help.
Off-Season Storage: Protect It When Not in Use
Whether you are packing your equipment away for summer break, clearing out space for a different sports season, or pausing your home workouts, correct storage keeps your track in top condition.
Leaving a mat carelessly tossed in a damp basement or a freezing garage can cause the material to degrade early. Following a reliable air track storage guide saves you from unpleasant surprises when you unroll the equipment next season.
To help coordinate your long-term storage strategy, refer back to our baseline Maintenance 101 checklist.
Pre-Storage Checklist
Before packing your air track into its storage bag, complete these three important preparation steps:
- The Bone-Dry Test: Ensure every single inch of the track is completely dry. Moisture is the number one enemy of stored inflatables. Even a tiny pocket of trapped water can grow destructive mold and mildew, which eats away at the vinyl and leaves a foul smell.
- Vacuum the Core: Attach your electric pump to the valve and switch it to the deflate or vacuum mode. Let the pump pull every last bit of air out of the track until it is completely flat like a piece of cardboard. A fully deflated track is much easier to roll up neatly without creating stiff, bulky bulges.
- Roll, Don’t Crease: Roll the track up loosely, similar to rolling up a sleeping bag. Avoid folding it with sharp, hard creases. Tightly creased PVC experiences high physical stress along the fold lines, which can crack or weaken when stored for months at a time.
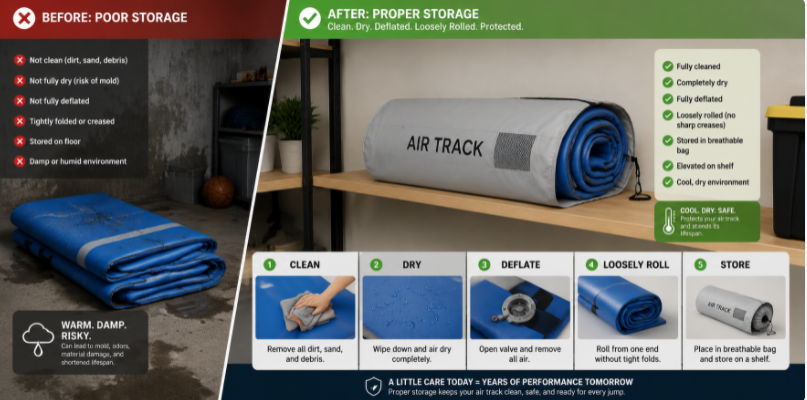
Ideal Storage Conditions
Where you store your equipment matters just as much as how you pack it. Always look for a storage spot that meets these clean, stable conditions:
- Climate Control: Store your track in a space with a stable, moderate temperature—ideally between 50°F and 75°F (10°C to 24°C). Avoid unheated backyard sheds or detached garages. Freezing winter temperatures make PVC stiff and brittle, while extreme summer heat can soften structural glues.
- Keep It Off the Ground: Store your packed air track bag up on a shelf, inside a cabinet, or on a raised pallet. Keeping it off the floor protects the bag from ground moisture and keeps it away from mice or insects looking for a warm place to nest.
- Avoid Heavy Stacking: Never stack heavy gym equipment, metal frames, or weighted boxes directly on top of a stored air track bag. Constant, heavy pressure can press the folded vinyl edges tightly together, causing deep creases or punctures.
Monthly Check-In
If you plan to store your air track for more than four consecutive months, schedule a quick monthly check-in. Pull the track out of its bag, unroll it flat on a clean floor, and let it sit for an hour in a warm room.
This simple step lets the vinyl material breathe, relieves stress along the fold lines, and gives you a chance to make sure no moisture or pests have made their way into the storage bag.
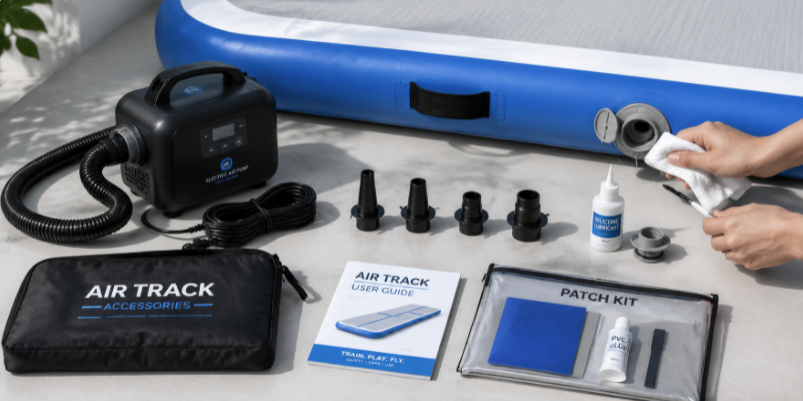
Caring for Accessories: Air Pumps, Valves, & Patches
An inflatable air track cannot function without its support system. To ensure your track inflates quickly and holds air reliably, you must take care of your pumps, valves, and repair materials.
Consulting a comprehensive User manual provides excellent long-term guidance for keeping your entire system working smoothly.
Air Pumps
The electric high-volume pump included with your track is a hard-working tool that needs basic care:
- Keep Air Vents Clear: Check that the cooling vents on the motor housing are free of dust, loose hair, or gymnastics chalk before turning it on. Blocked vents can cause the pump motor to overheat and burn out early.
- Avoid Extended Running Times: High-volume electric pumps are built for quick bursts of inflation. Do not run your pump continuously for more than 10 to 15 minutes. If you need to inflate multiple long tracks back-to-back, let the pump cool down for 5 minutes between tracks.
- Neat Cable Storage: Coil the power cables loosely when you are done. Wrapping cables tightly around the pump body can kink the wires inside, leading to electrical shorts.
Valves
The valve assembly is the gatekeeper of your mat's air pressure. If it gets dirty or loose, the track will slowly lose its bounce:
- Use the Valve Wrench: Every air track comes with a black plastic pronged wrench. Over time, the repeated vibration from tumbling can cause the internal valve core to loosen slightly from the outer housing, resulting in a slow leak. Use the wrench to check and tighten the valve core clockwise every few months.
- Clear Away Sand and Dust: If you train outdoors on grass or near a beach, tiny grains of sand or dirt can lodge inside the rubber valve seal, keeping it from closing completely. Use a blast of clean compressed air or a soft dry brush to clear out the valve throat.
- Always Use the Protective Cap: Never leave an inflated track sitting out without screwing its protective valve cap securely into place. The cap provides a secondary airtight seal and keeps dirt from falling into the valve mechanism.
Patches
Keep your repair kit in a safe, accessible spot so you can handle unexpected punctures right away:
- Seal Glue Containers Tight: Vinyl repair adhesive dries out quickly once opened. Make sure the cap is screwed on tight, and store the tube inside a sealed, airtight jar or zip-top bag to keep it fluid.
- Keep Patch Sheets Flat: Store your spare vinyl patch material flat in a drawer or folder. If the patch sheets get wrinkled or curled up, they will be much harder to glue flat against a punctured track.
FAQs: Common Maintenance Questions Answered
Q1: Can I use a regular bike pump for my air track?
A: No, you cannot use a standard bike pump or a car tire inflator on an air track. Inflatable tracks require a high volume of air at relatively low pressure.
Bike pumps do the exact opposite: they deliver a very low volume of air at high pressure. Trying to fill a 15-foot air track with a manual bike pump would take hours of exhausting work and could ruin the specialized valve. Always use the high-volume electric pump designed specifically for air tracks.
Q2: How often should I clean my air track?
A: Your cleaning schedule depends entirely on how often the mat is used and where you set it up:
- Commercial Gyms / High Traffic: Sweep away dust and loose chalk after every working day. Wipe down the entire surface with a damp, soapy cloth at least once a week.
- Home Setup / Light Use: Wipe the surface clean every two to three weeks, or whenever you notice visible scuffs, dirt, or dust.
- Outdoor Setups: Always sweep and wipe down the bottom of the track immediately after using it on grass or outdoor surfaces to clear away dirt, sap, and moisture before packing it away.
For more detailed maintenance timelines, refer to our comprehensive Cleaning guide.
Q3: My track has a musty smell—what’s wrong?
A: A musty smell means the track was packed away with trapped moisture, allowing mold or mildew to grow inside the storage bag or on the vinyl surface.
To fix this, unroll the track completely in an outdoor space on a warm, sunny day. Wash the smelly areas thoroughly with a mix of one part white vinegar to four parts warm water. The vinegar safely kills the mold spores and neutralizes the odor without harming the PVC material. Let the track air-dry completely in a well-ventilated area before rolling it back up.
For more troubleshooting tips on keeping your mat fresh, check out our User manual resource.
Conclusion
Taking care of your air track does not have to be a chore. By setting up a simple cleaning routine, patching small punctures early, and storing the mat in a clean, dry, climate-controlled space, you can keep your equipment in top condition for years.
Good inflatable air track maintenance protects your investment and ensures that every time an athlete steps onto the lane, they enjoy a clean, safe, and perfectly bouncy surface that helps them train with confidence.


